


前一篇已經教學如何取得金鑰與存取簽章,有了金鑰或是存取簽章就開始可以程式來存取 blob storage 內的東西,azure 提供其中一個方法是使用 RESTful API 進行存取,其好處是不論在前端還是後端的程式只要有URL,便能夠直接透過HTTP來進行存取,本篇教學如何使用 RESTful API 存取 blob 資源。
(這邊只以較常用且簡單的新增、修改與刪除示範,如果要更詳細使用可以參考官方手冊: Blob service RES API)
相關文章:
[教學] Azure Blob Storage 使用指南 – 創建篇
[教學] Azure Blob Storage 使用指南 – 金鑰與存取簽章篇
[教學] Azure Blob Storage 使用指南 – RESTful API 存取篇
資源的 URL
如果要存取指定檔案,則需要知道資源URL是如何組成的,每個 blob 都會有自己獨立的 URL。
blob 的 URL 預設組成為:
https://<storage-account-name>.blob.core.windows.net/<container-name>/<blob-name>
舉例:
- 儲存體帳戶名稱 (storage account name):xenbyStorage
- 容器名稱 (container name):images
- blob 名稱或路徑 (blob-name):backgrounds/snow.jpg
那此資源的 blob 便是:
https://xenbyStorage.blob.core.windows.net/images/backgrounds/snow.jpg
而要對該資源操作就將前一篇取得的 金鑰 或 簽章 直接用問號符 (?) 串在 URL 後面就能使用
舉例:
取得的簽章為
sv=2017-11-09&sr=c&se=2019-12-25T11:40:51Z&sp=racwdl&sig=G9f2QVnMYzTUVBJRXvyP6OOI%2B4l%2FhcAFOirPrdzZ%2FBM%3D
那要操作時要打的API URL便是:
https://xenbyStorage.blob.core.windows.net/images/backgrounds/snow.jpg?sv=2017-11-09&sr=c&se=2019-12-25T11:40:51Z&sp=racwdl&sig=G9f2QVnMYzTUVBJRXvyP6OOI%2B4l%2FhcAFOirPrdzZ%2FBM%3D
API 操作對應的 http method
| method | 說明 |
|---|---|
| GET | 取的資料內容 |
| PUT | 新增檔案 or 對已存在的 BLOB 覆寫 |
| DELETE | 對已存在的 BLOB 進行刪除 |
GET 與 DELETE 只需要對該資源 URL 打對應的 http method API 便可以
而 PUT method 則需要在 header 上特別設定 x-ms-blob-type 欄位的值為 BlockBlob,才能夠正常使用
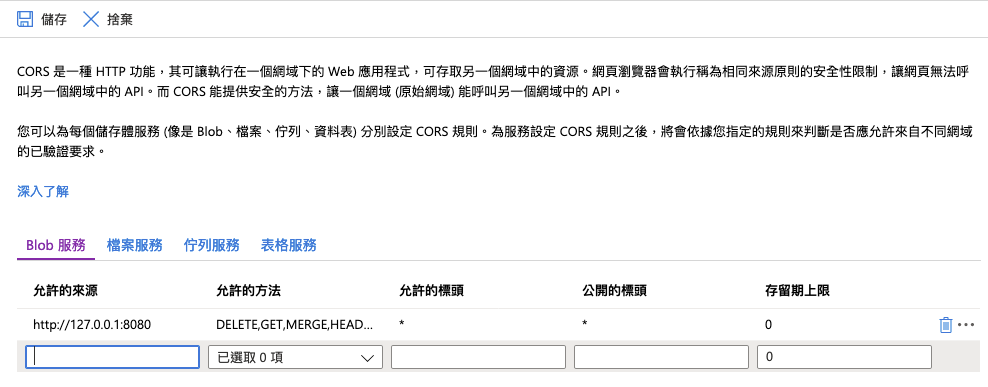
CORS 設定 (cross domain acess 跨來源資源共用)
在瀏覽器前端程式用 javascript 來操作時,要注意瀏覽器的 cross domain 問題,需先在後台設定允許的 domain,如果非瀏覽器的應用可以直接跳過此步驟
首先進入 azure portal 後台到要設定的 storage 頁面點左邊的 CORS

接著設定允許透過瀏覽器 cross domain 打此 API 的 domain 以及可以操作的權限後點左上方的儲存便可
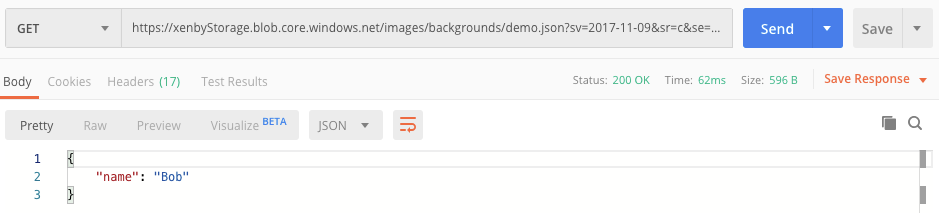
Post Man 示範
post man 是一個開發 API 非常方便的工具,可以模擬送 request 到指定 API 並且方便檢視 response
1. 取得資料內容 (GET method)
直接對含有簽證的 URL 進行 GET method 便可
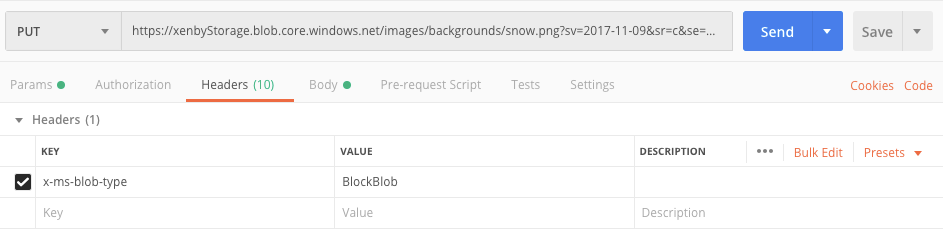
2. 寫入資料或是覆蓋資料 (PUT method)
需要在 header 中加入 x-ms-blob-type 並且值設定成 BlockBlob

接著在 Body 中選擇 raw 直接輸入要寫入的內容

3. 上傳檔案或是覆蓋原本檔案 (PUT method)
在 header 中加入 x-ms-blob-type 並且值設定成 BlockBlob
接著在 Body 中選擇 binary 並選擇要上傳的檔案

4. 刪除已經存在的檔案 (DELETE method)
直接對含有簽證的 URL 進行 DELETE method 便可

javascript 示範
前端的程式可以直接對URL進行上傳,不用擔心上傳頻寬對伺服器的負荷 (這邊使用 axios library 示範)
1. 取得資料
async function getData() {
    let blob_url = getBlobUrl();
    let response = await axios.get(blob_url);
    return response.data;
}
2. 更新文字資料
async function updateData() {
    let blob_url = getBlobUrl();
    let updateContent = 'update demo';
    let response = axios.put(blob_url, updateContent, {
        headers: {
            'x-ms-blob-type': 'BlockBlob'
        }
    });
}
3. 上傳檔案
async function uploadFile() {
    let blob_url = getBlobUrl();
    let file = document.querySelector('#upload-file').files[0];
    let fileReader = new FileReader();
    fileReader.onload = async function() {
      let response = await axios.put(blob_url, fileReader.result, {
          headers: {
              'x-ms-blob-type': 'BlockBlob'
          }
      });
    }
    fileReader.readAsArrayBuffer(file);
}
4. 刪除檔案
async function deleteFile() {
    let blob_url = getBlobUrl();
    let response = await axios.delete(blob_url);
}