我們在開發與維護網站的時候,有時可能會有一些原因需要查詢 log,而紀錄 log 的解決方案有很多,例如:Cloudwatch、DataDog… 等都蠻常見的,如果是自架的方案最常見的就是 ELK 了 (ElasticSearch + LogStash + Kibana) ,其使用了 Elastic Search 強大的資料量處理能力以及搜尋功能,並且有高可擴充性以及可客製化的優點而受到大家青睞,本篇將教學如何直接使用 FileBeat 把資料送進 ElasticSearch 而不需要經過 LogStash
相關連結
Elastic Search 官方網站:https://www.elastic.co/
Filebeat 官方網站:https://www.elastic.co/beats/filebeat
在程式中將 request 以 json 格式紀錄下來
最一開始的步驟是我們需要把想要的 log 存下來
這邊使用 NodeJS 以及紀錄 API access log 做範例
如果是其他程式語言或是其他框架
則依據自己需求進行實作
可以直接跳到後面的 filebeat 設定
設定將 request 記下來的 middleware
首先安裝 nest-winston 與 winston
npm install --save nest-winston winston
在 app.modules.ts 中載入 WinstonModule
import * as winston from 'winston';
import { WinstonModule } from 'nest-winston';

@Module({
  imports: [
    WinstonModule.forRoot({
      transports: [
        new winston.transports.File({
          filename: 'logs/http.log',
          level: 'http',
        }),
      ],
    }),
  ],
})
接著建立一個 global middleware 把所有的 request 寫入至檔案 logs/http.log 中
import { Inject, Injectable, NestMiddleware } from '@nestjs/common';
import { Request, Response, NextFunction } from 'express';
import { WINSTON_MODULE_PROVIDER } from 'nest-winston';
import { Logger } from 'winston';
import * as moment from 'moment-timezone';

@Injectable()
export class RequestLoggerMiddleware implements NestMiddleware {
  constructor(
    @Inject(WINSTON_MODULE_PROVIDER) private readonly logger: Logger,
  ) {}

  use(request: Request, response: Response, next: NextFunction): void {
    const { ip, method, path, body, query } = request;
    const userAgent = request.get('user-agent') || '';
    const time = moment().format();

    response.on('close', () => {
      const { statusCode } = response;

      this.logger.http('http', {
        ip,
        userAgent,
        method,
        path,
        query: JSON.stringify(query),
        body: JSON.stringify(body),
        statusCode,
        time,
      });
    });

    next();
  }
}
export class AppModule {
  configure(consumer: MiddlewareConsumer) {
    consumer
      .apply(RequestLoggerMiddleware)
      .forRoutes({ path: '*', method: RequestMethod.ALL });
  }
}
此時將伺服器啟動,如果成功設定後會看到 http.log 中有我們的 request

使用 filebeat 將 log 送進 elastic search
我們已經成功將 log 寫進檔案中了
接下來我們要將寫進檔案內的資料送進 elastic search 中
首先要先設定 filebeat.yml
(這邊只寫我們用到的,詳細可以參考官方文件)
nestjs-filebeat.yml 內容:
- filebeat.inputs:設定檔案的位置與格式
- processors:資料處理,因為 filebeat 本身會送其他資訊給 elastic search,所以我們使用 drop_fields 把沒有需要用到的欄位去掉
- output.elasticsearch:資料輸出到 elastic search 的設定,包括帳號密碼以及建立的 index 名稱
- setup.template.*:我們設定自定義 ElasticSearch 的欄位所要用的 template 格式,如果沒有自定義,elastic search 會使用內建的 template
# 設定 log 檔案位置
filebeat.inputs:
  - type: log
    enabled: true
    codec: json
    json.message_key: msg
    json.keys_under_root: true
    paths:
      - /path/to/logs/http.log
    tail_files: true

# 資料處理,將不需要的內建欄位去掉
processors:
  - drop_fields:
      fields:
        - input
        - ecs
        - log.offset
        - agent.type
        - agent.id
        - ecs.version
        - log.file.path
        - agent.ephemeral_id
        - agent.version
        - agent.name
        - agent.hostname
        - host.name

# 指定輸出至 elastic search 的特定 index
output.elasticsearch:
  hosts: ["http://localhost:9205"]
  username: "elastic"
  password: "********"
  index: "nestlog-%{+yyyy.MM.dd}"
  template.enabled: true

setup.template.name: "nestlog"
setup.template.fields: "nestjs-fields.yml"
setup.template.pattern: "nestlog-*"
setup.template.overwrite: false
setup.ilm.enabled: false
nestjs-fields.yml 內容:
要注意的地方:
- 資料格式: 假如設定的格式與實際打給 elasticsearch 的不同,此 log 會被直接完整的丟掉,不會進 elastic search
- 分詞器 (analyzer):如果沒有設定分詞器,預設會建立不使用分詞器
(norms: false) - default_field:預設為 false,如果沒有設定為 true,使用 simple_query_string 會搜尋不到
- key: nestlog
  title: nestlog
  fields:
    - name: statusCode
      type: keyword
      required: false
      description: >
        Comment made by the user.
      default_field: true
    - name: ip
      type: text
      required: false
      analyzer: simple
      default_field: true
    - name: userAgent
      type: text
      required: false
      analyzer: simple
      default_field: true
    - name: method
      type: text
      required: false
      analyzer: simple
      default_field: true
    - name: url
      type: text
      required: false
      analyzer: simple
      default_field: true
    - name: query
      type: text
      required: false
      analyzer: simple
      default_field: true
    - name: body
      type: text
      required: false
      analyzer: simple
      default_field: true
      ignore_above: 30000
    - name: time
      type: date
      required: false
      default_field: true
啟動
注意:以上面的範例來說,filebeat 會在啟動的時候檢查是否有 nestlog 這個 template,兩種情況:
- 如果已經存在,則不會蓋過
- 尚未存在,使用 nestjs-filebeat.yml 裡面的設定蓋過
./filebeat -c nestjs-filebeat.yml -e
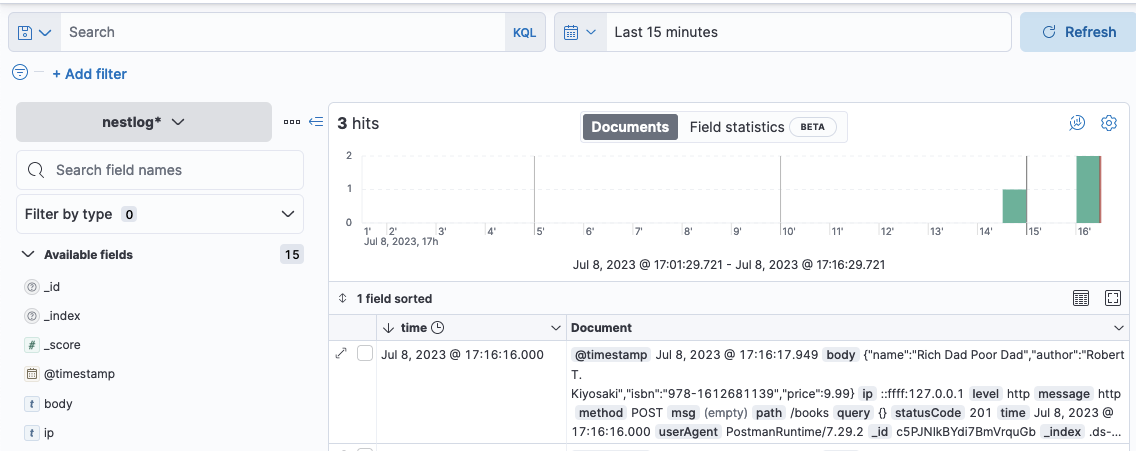
到 kibana 上查看 Log
開啟 kibana 的網頁
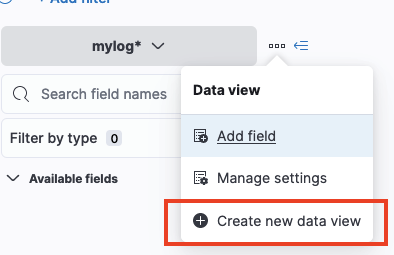
到 Discover 頁面上找到「Create new data view」
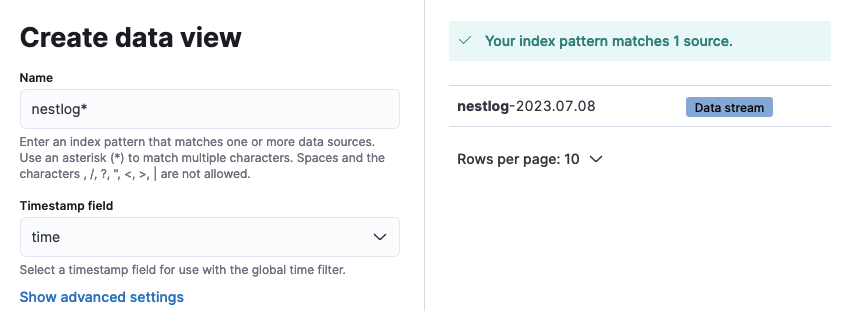
輸入要篩選的 pattern,例如我們在 filebeat.yaml 中
output.elasticsearch.index 的格式為 nestlog-%{+yyyy.MM.dd}
那我們就將 Name 設定為 nestlog-*
而 timestamp field 的部分,因為我們 log 中時間的欄位為 time,則選擇我們選擇 time
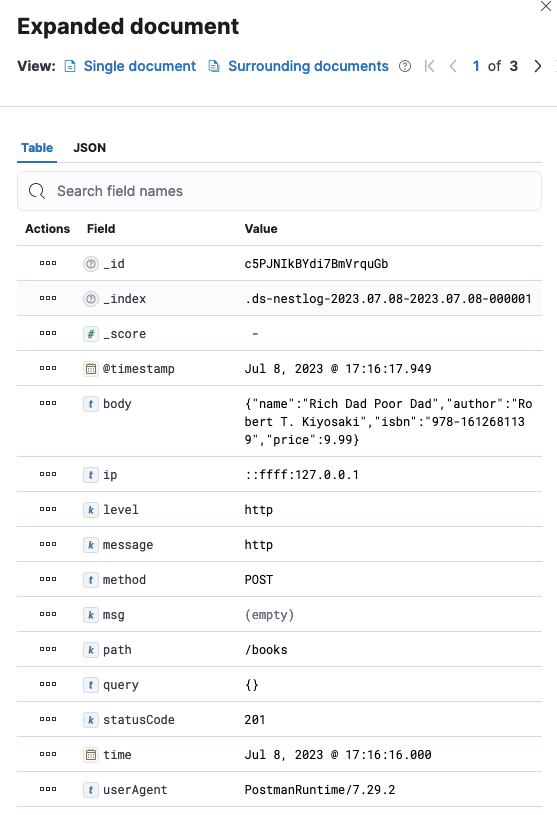
建立後就能看到我們的 request log 了